I was trained to paint properly way back when I started my design career over twenty years ago. As a junior designer at Benjamin Moore Paints, I never dreamed that I would learn so much useful knowledge about colour and paint!
Here is what I told Jennifer on Breakfast Television in Toronto.
1. Buy a metal cage
The cage is the metal handle that holds the actual roller or sleeve. The better this is, the longer it will last, it won’t squeak when rolling or rust when washed.
2. Buy a sleeve with a plastic centre
The sleeve is the ‘furry’ cylinder that you put on the metal cage or handle. If you buy a cheap sleeve with a cardboard interior, it will start to fall apart when it gets wet in the paint. Then it will leave small fluffs on your wall so all your hard work ends up looking bad!
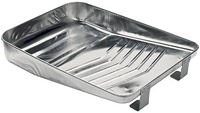
 3. Buy a large paint tray
This is so much easier as you can pour almost a full can of paint into the tray which means less pouring of paint and hopefully less mess! This also means less stopping the job of pouring paint into the tray.
4. Really coat the roller sleeve
When putting paint on the roller, really coat the roller sleeve. It is designed to hold paint. Fluffier roller sleeves hold more paint which means you go to the tray less often and this will speed up the job. Really soak the roller in the tray so it absorbs the paint.
5. Avoid tiny strokes in a small area
When applying the paint to the wall do not roll it in tiny strokes back and forth in one small area! Begin by rolling a large W shape on the wall with the roller and then roll the wall fully from top to bottom. This will lay out the paint better and faster.
6. Apply the recommended amount of paint
Apply the recommended amount of paint to the wall. Often people try to stretch their can of paint a little farther by not applying as much as suggested by the manufacturer. There is no value in this as the paint is meant to be applied to a certain thickness to give you the right colour and durability. Too little paint compromises this!
7. Don’t brush all the edges first
Although it is tempting to ‘cut-in’ or brush all the edges of the walls before rolling the paint on, you are less likely to get a good finish. It is best to brush a little of the edges then roll into that wet paint, and continue this process down the wall. It takes longer but you will find the coverage of the colour more even.
8. Always use two coats of paint
Yes, you usually need two coats of paint to develop the colour well or to ensure you don’t miss any spots. There are some brands of paint that suggest you only need one coat but I have found this to work only with a light colour over another light colour and when I take my time applying the paint.
9. Store your paint cans upside down
Paint does not go bad as long as it’s not kept in extremely cold conditions. Seal the lid very well (Place the lid on the can, cover it with paper, hammer the lid in place, remove the paper) and turn the can upside down in a cool dry area for storage. When the can is turned right-side-up again, it mixes before you dip your brush in.
10. Buy a good paintbrush
Buy one good paintbrush! Cost can be an issue but a good brush means you will only buy it once if you clean it after you have done the job. A good brush has ‘flagged’ ends and is angled. Flagged ends look like the bristles are uneven and with split ends. This lays out the paint in a much smoother fashion. And once you do clean your brush, use the hole in its handle to hang it up to dry. Never leave a paintbrush sitting in a pot! I use a wire coat hanger turned upside down to dry my brush. (Hook the brush’s handle on the ‘J’ shaped end of the hanger and hook the triangular part of the hanger over a doorknob.)
Bonus Tip
 Can’t find an opener for your paint can? A screwdriver or keys will work but if you are Canadian the best thing ever is a loonie or toonie to open the lid of a paint can! It’s always available and super strong for this type of job. Thanks, Canadian Mint for the convenient opener. Even if you are not the best painter and not using the best paint, great tools will make the job easier, faster and it will look better! Guaranteed.

